Recently I took out my old Dremel rotary tool that had been collecting dust and played around with some walking sticks, carving a couple wood spirits. After carving mostly with knifes for the last few years, I wasn't a big fan of the dust! Guess I'll have to get a nicer fitting mask...
My son has been playing "Whomp' em" lately, a classic Nintendo game and he recently beat the "Ice Ritual" boss and he was so proud, quite the accomplishment. I figured, carving out a picture of the ice boss, which I am calling a dragon but that is up for debate, would be a cool project and a nice gift for him.
If you would like to try Whomp' em yourself, I highly recommend it, you can get remakes of the old Nintendo with hundreds of games (including Whomp' em) on Amazon. We purchased a cheaper version for about 25 dollars, however there are issues with the controls working correctly on some games and graphic quality seems poor. If you are willing to pay more, Nintendo has made their own remake which is much higher quality.
On to the carving
First I edited a screenshot of the boss (picture on left) so that it was appropriate for carving, I used the GIMP open-source graphics editor to clip, improve edges, scale-up and remove color. Feel free to download and print the final full size image on the right if you want to try this project:
|  | | Edited full size image to carve (click to download) |
|
I used an old 3/4" pine board that was about 6 1/4" wide by 9 1/4" tall that was exposed to the sun resulting in a darker more golden outer color than the wood beneath. You may have better results with hardwood. The plan was to use the contrast between the outer layer of wood and the wood beneath to help make the carving "pop".
Removable spray adhesive was used to hold the image to the wood during the carving. This is similar to how I do scroll saw work if using a printed template but was the first time I've tried it with power carving, it worked well although the adhesive and paper can sometimes clog the burrs but is easily removed.
I recommend carving most of the project with a Kutzall extreme flame burr for speed, probably the best bit you can get for this type of carving. I use around 20,000 RPM and a cheap flex shaft attachment for better control. Any rotary tool should work, use what you have.
 | | Glue drawing down with spray adhesive |
|  | | Rough carving outline |
|
I decided to relief carve the white areas but it might look nice the other way too.
 | | I had an accident with the burr running over the carving, keep a firm grip and be careful! |
|  | | Roughed out with flame burr |
|
Clean up the carving and slightly undercut outer edges. I used a a ball bit to smooth and clean most of the surface, another really useful bit is a dovetail for undercutting the edges of a relief carving and for smoothing flat surfaces, I also used sanding drums and a flat chisel to flatten out the backdrop areas.
After most of the clean up was done I removed the glued down drawing to expose the sun-stained pine.
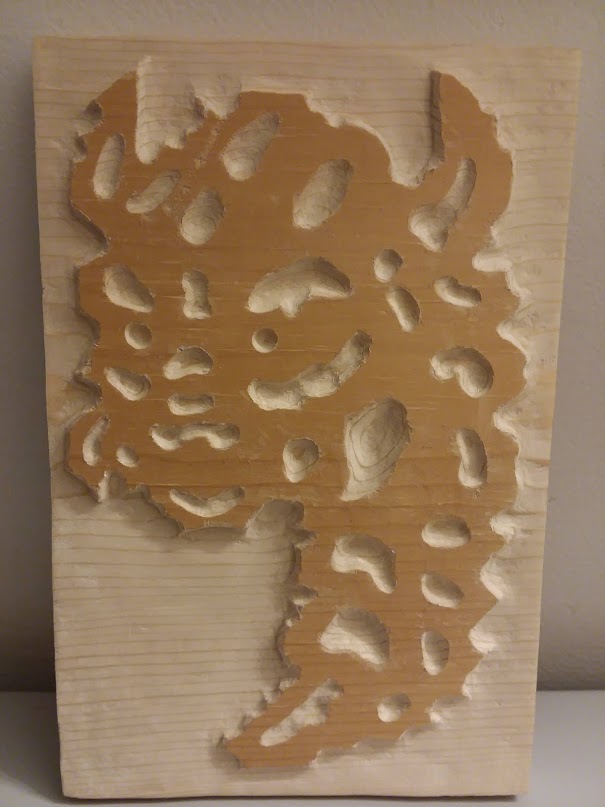 |
| Mostly finished. |
Overall this was a lot of fun and really forgiving. If you are just getting into power carving this sort of project is perfect.
I'll finish it up with a thin amount of satin clear coat to seal the wood from moisture and protect it.
Looking back, I would feather out the interior reliefs more. This carving would also look nice if painted.


Comments
Post a Comment